
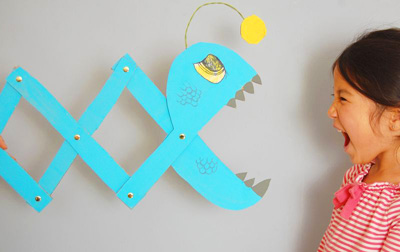
 Go, Go, Gizmo!
It's hard not to love a DIY toy with the ability to move based on simple mechanics — and that's exactly why we can't get enough of this homemade "long-reach gizmo" featured on Giddy Giddy!
Made using cardboard, brads, scissors, and acrylic paint, long-reach gizmos are easy to make when you're in a rainy-day-play pinch, and they're sure to provide plenty of giggles from your bored brood. Teri's little ones chose to make an angler fish and an alligator, but the options are truly endless when it comes to how your kids can decorate their own new playtime chompers! Check out the rest of Teri's full tutorial to see their additional gator gizmo and for plenty of helpful tips and tricks.
 Rainbow Bright
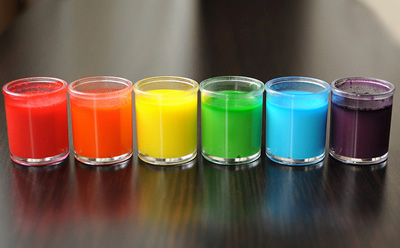
Got a couple young budding artists in the house? (We do, too!) Mom Jill of Meet the Dubiens offers up a super-easy recipe for making these gorgeous homemade watercolors.
Perfect for making your own indoor rainy-day rainbows, these bright and beautiful DIY paints are made using baking soda, white vinegar, light corn syrup, cornstarch, and gel food coloring. Jill says that after using this recipe she'll never go back to using store-bought colors again, and even calls them "amazing" and "far superior" to their purchased colorful cousins. One major bonus to going homemade is that since you're the one in control of adding the food coloring, your colors can be as vivid as you see fit! Check out the rest of Jill's post for the full tutorial and to see the rainbows her kiddos created with their cool watercolors.
 Marker Magic
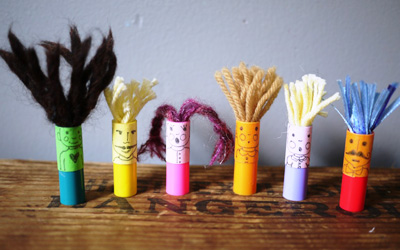
Got old dried-up markers still hanging around the art table? Turn them into easy-peasy cool finger puppets like these characters featured on The Handmade Adventures of Captain Crafty!
It's no surprise that marker caps fit perfectly on small fingers, so there is no better way to give those old plastic caps a second act in life as playroom puppets. To get started creating your own, Captain Crafty Mama Zoe says that you'll want to have caps, colorful yarn, masking tape, a black pen or markers, and glue (or a glue gun) on hand. Check out the full tutorial for plenty of magical marker tips — these fun new finger puppets are sure to get you through the rainy season with plenty of imaginative fun!
 Marble Masterpiece
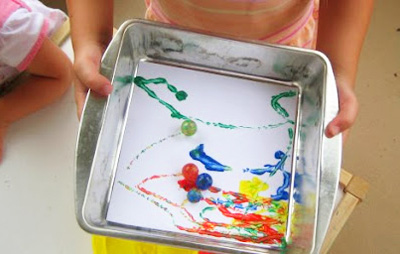
Speaking of budding young artists, if you've got a little one who channels Jackson Pollock, he'll surely go bananas for this marble painting activity featured on The Mother Huddle!
A great idea for making masterpieces in a matter of minutes, this project only requires some marbles, paint, paper, and a baking pan — all common materials found around the house! Not only will you have some new artwork to hang on the fridge, but your little ones are sure to get a kick out of seeing what they can create with only a wee bit of rolling. Check out The Mother Huddle's full post to see how their own marble painting turned out and for extra tips on getting started.
 Rainy Day Theater
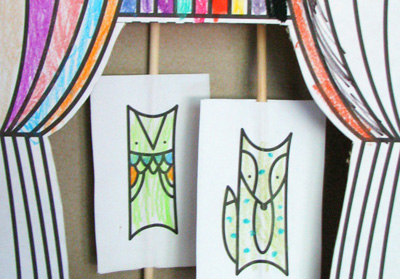
Nothing's better for a rainy day than puttin' on a show — and that's exactly why we can't get enough of this cool homemade puppet theater featured on BKids Crafts.
To get started, Mom Kayanna says that you'll want to have an empty cereal or cracker box on hand, along with scissors, glue, an X-ACTO knife (for Mom or Dad's use), coloring supplies, and small dowels (think bamboo skewers, popsicle sticks, or twigs). And for everything shown, you're in luck — Kayanna offers up the printable templates for both the puppets and the stage! She says that this was a great activity for keeping her own daughter busy, and that with older kids, you could also consider having them make scenery for the stage, or have them act out their favorite stories. Be sure to check out the post for the free templates; this is one production that's sure to chase away those rainy-day blues!
 Lanterns of Lore
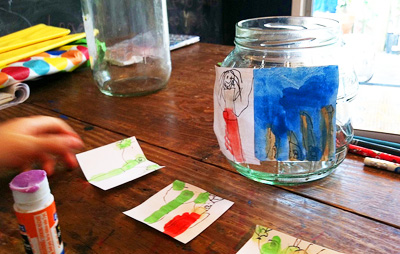
Mom Amy of Mamascout shares this clever idea for making story lanterns with her littles — what a great project for unleashing your child's creativity!
Having found the project in Alphabet Glue (full deets in her post), Amy says that this was a great project for her 9- and 5-year-old kids and that these personalized jars would make great gifts, solstice jars, and more. To make your own bright lantern jars, have your child paint and write out a story on pieces of paper, then glue them onto the sides of the jar. Once the papers have dried, simply add a tealight candle to the jar and watch as your child's story comes to light before your eyes!
 Surprise Eyes
We're always a sucker for activities that involve googly eyes, and this fun idea for "eye-bombing" featured on Mini-eco is definitely at the top of our list!
A super easy idea for a fun boredom-busting afternoon activity, eye-bombing only requires a pack of googly eyes with adhesive backing (extra points for various sizes!) and a roomful of objects to stick them on — sometimes having a good time really can be that simple! Check out Mom Kate's full post to see a variety of neat things that her brood eye-bombed, including a cactus, a door handle, a hole puncher, and more. This would also be a fun project to do before Dad gets home — you're sure to get plenty of giggles as he finds each funny new friend!
 Rainy-Day Game Play
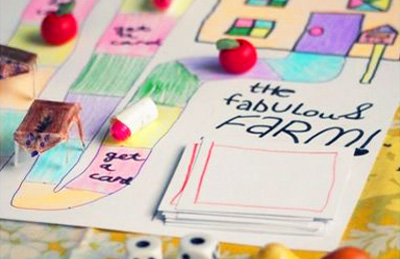
Looking for a new Friday night board game to play as a family? Have your child try her hand at designing her own — like this cool DIY adventure game featured on One Crafty Mumma!
Mom Melissa says that though they've made many a homemade board game in the past, this was the one that really did the trick. To get started, her little one got busy plotting out the game's look on a pad of paper, and then began crafting the cards and treasures that would be picked up along the way. Who knows — you may just end up with a fabulous farm of your own! Check out Melissa's full post for more great pictures of the homemade game and to see daughter Bella's included rules.
 Rollin' Racers
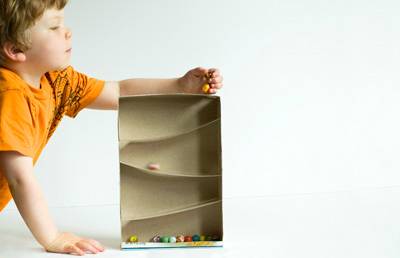
If you've got a youngster who loves watching marbles zoom by on slides, be sure not to miss out on this quick and easy DIY idea for making a cereal box marble run on Made By Joel!
Another great crafty activity that goes to show fun can come in all shapes and sizes, this homemade marble run is also a fantastic way to upcycle a common pantry item — not to mention that this game may just stay in style with your little ones throughout the year! To make your own marble run, you'll only need to have a box, marbles, tape, and scissors (or a knife) for cutting the run's slides. Check out Dad Joes' great walkthrough for tips and tricks. And, if you're feeling extra-crafty, consider making a larger marble run with the help of your pint-sized architects!
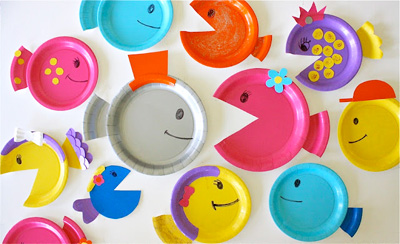 Swimming with the Fishes
Talk about a super-cool school! Mom Dana of the ever-fabulous site MADE shares this clever idea for making colorful Pac-Man-esque fishies — and the sky's the limit on how you can deck out these gilled friends.
To make your own school of bright and beautiful fish, simply gather up some colorful party plates and get to work on giving them their own personalities. Dana says that the fish entertained her daughter for two days and that she even made them little beds to sleep in on their family's couch (aw!). Check out the rest of Dana's post to see a variety of fun images of their new friends, and for a great book recommendation that goes absolutely perfectly with this crafty project!
 Brushless Paintings
NurtureStore offers up this genius idea for creating a "no paint brushes allowed" painting station — and really, what could be more fun?
To get started, Mom Cathy set out a big roll of paper with plenty of room for the young artists to really work their magic. Then, the kids got the chance to roam the house in search of their perfect painting tools, finding household items with different textures such as a potato masher, a nail brush, bubble wrap, silverware, a shower loofah, sponges, and more. Check out the full post to see photos of their colorful creations.
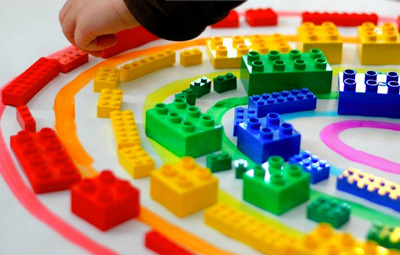 Over the Rainbow
Need a colorful rainbow to brighten up that rainy day? Don't miss out on this super quick and easy idea for creating your very own Lego rainbow featured on Quirky Momma!
A fabulous idea for younger children who are just beginning to learn their colors, this project only requires a variety of colorful Legos and a paper outlined with a visual organizer (optional). Overall, this activity is perfect for when you're in need of a spur-of-the-moment edutainment project — and it's one that's sure to hold your child's concentration and start a great conversation about primary colors!
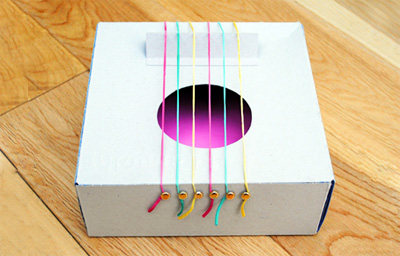
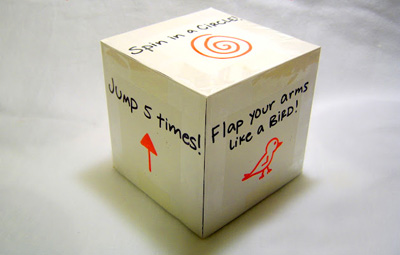 Work It Out!
A stormy afternoon can certainly leave you with a house full of restless tots, but Little Family Fun shows us just how you can work out that extra energy with this clever DIY physical activity cube.
Easily made using white cardstock, tape, and some markers, this fun physical activity cube will help your clan work off a little of that rainy-day pent-up energy, all while offering up the chance to share plenty of silly moments together! Sure, the playground may look more like the pool, but you've got a living room with plenty of space for twirling and flapping your arms like a bird. Not too shabby for a gloomy afternoon!
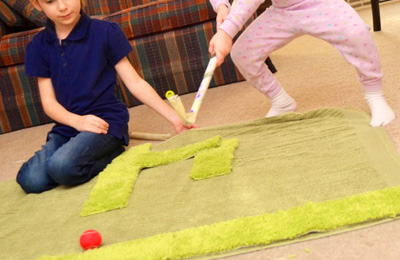 Putt Putt Perfect
Ever wished that you had your own mini-golf putting course? Thanks to smart Mama Valerie of Inner Child Fun, these dreams can now be within reach!
This DIY carpet golf game can easily be made using a bath mat for the "green," a cut-up shaggy bath mat for the course, soft mini tennis balls, and clubs made of newspaper and masking tape. So genius! Valerie notes that they got plenty of play out of this game since the shaggy mat strips can be placed at different angles for a round of various courses. Check out her full post to see how they made the final goal area, along with her pictures of her daughters' adorable winning rock star dances!
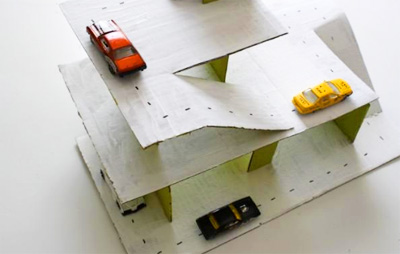 Parkin' It
Got some race cars that love to cruise around the house? Why not make them a sweet homemade parking deck like this one shown on Kinderpendent?!
Sure to put those gray clouds out of mind, this DIY parking deck can be easily made using cardboard scraps and a glue gun. Before you get started on building your structure, let your little ones loose with some paint — you could even add some "graffiti" to the parking structure's walls for extra decoration! Be sure to check out Mom Alexandra's full tutorial for tips on constructing your own deck — she also includes a link to a cool, homemade cardboard castle that they made as well.
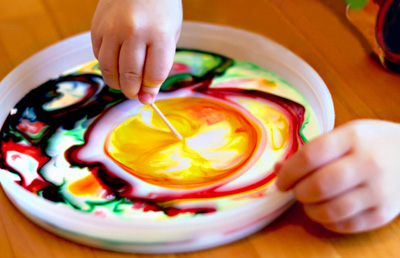 Magical Milk
Who knew that such amazing artwork could be created by just adding milk? Needless to say, we cannot get enough of this fun project for milk painting featured on Modern Parents Messy Kids!
Mom Stephanie says that this project was both beautiful and easy — only requiring a tupperware container lid, milk, food coloring, dish soap, and "magic" toothpicks. Once your food coloring has been dropped into the milk, simply dip the toothpick into a dish with dish soap and have your child add it to the colorful milk concoction. The soap disrupts the surface tension of the milk and causes the colors to radiate away, creating a gorgeous Milky Way-esque masterpiece. Overall, this is one afternoon art activity that's sure to become a new family favorite!
 The Sound of Music
It's a given fact that music makers can always brighten up an afternoon, and this homemade cardboard guitar featured on Mini-eco is sure to do just that for the aspiring musicians in your home!
Mom Kate came up with the idea for making this sensational strummer after Christmas when they had a bunch of extra cardboard box leftover from gifts — and though she says she most likely won't be busting out her own rendition of "Purple Haze" anytime soon, Kate admits that with a little bit of fiddling, favorite songs such as "Twinkle, Twinkle Little Star" are completely within reach. To make your own homemade guitar, you'll want to have a thick cardboard box, along with an extra piece of cardboard for the raised bridge (Kate notes that this is the main secret for it working well), rubber bands, and brads. Be sure to check out her full post for the full scoop on getting started!
 Memory Marvels
Curly Birds Mom Helen shares her family's fun version of the classic memory tray game that she played with her daughters, and she said that it was just what they needed for some fun indoor time on a cold February day!
Helen admits that though she doesn't remember this easy DIY game "being quite that exhilarating when [she] was young," her twin daughters were over the moon — and literally jumping up and down over figuring out which piece had gone missing! To make your own memory tray, simply gather up 9-12 common objects and spend a couple of minutes examining the tray with your tots before covering it with a cloth. Take one item away, uncover the tray, and let them try to figure out which item has gone amiss — that's all there is to it! Helen notes that they added an extra step of wrapping the "missing" item in cloth, since the excitement of unwrapping things is always fun, and that overall, the game inspired the girls to go on a treasure hunt for their own memory game items to include.
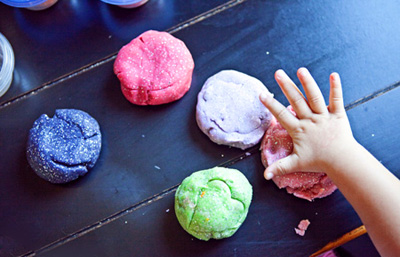 Glitter Galore
Mom Shawna of The Creative Mama certainly takes homemade play dough up a sparkle with her fun idea for making this play-table staple colorful and glittery.
Living in Texas, Shawna has the exact opposite problem of living in a climate where the rain falls year-round — her indoor activities are rather needed for when it's too hot to play outside! Shawna said that this glittery homemade play dough only took a whopping 30 minutes to make at most, and that it kept her 2-year-old daughter busy as a bee for hours and hours! The recipe can be made with food coloring or Kool-Aid, but she recommends using the fruity juice since the sweet smells will carry over into the dough. Check out the full post for Shawna's full recipe, and if you've also had problems with creating the perfect DIY play dough, this may just be your new go-to recipe; Shawna says that it came out perfectly — with plenty of sparkles included (always a bonus in our book!).
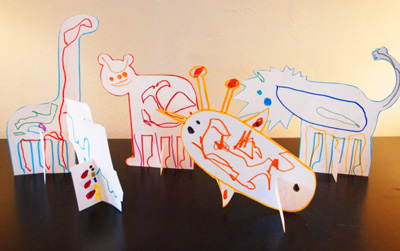 Goin' to the Zoo
Sure, a rainy day may not be ideal for a day out at the zoo, but who says you can't make your own zoo — like this cool pop-up paper zoo featured on TinkerLab!
To get started on your own pop-up zoo, you'll only need to have cardstock on hand, along with scissors, and all of your favorite coloring tools (markers, crayons, colored pencils). Simply cut out your animal shapes and get to work on decking them out with all of the bells and whistles — er, that is fur and feathers! Once your animals are complete, cut a slit in the bottom of each one and add another piece of cardstock to make them 3D — easy! Check out Mom Rachelle's full post for more details, and to see up-close pictures of her daughter's paper menagerie.
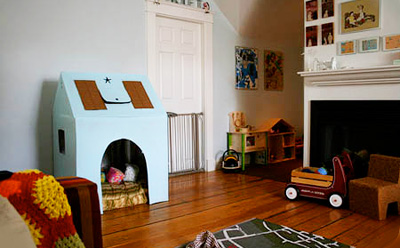 Pop-Up Playhouse
Speaking of cool DIY pop-ups, don't miss out on this fantastic homemade playhouse featured on Make Baby Stuff!
Certainly a quick, eco-friendly, and thrifty way to make your tot their very own pop-up playhouse, this fun mini-manse can be easily made by Mom or Dad with the following materials: large cardboard boxes, duct tape (the most useful item in the universe!), glue, a boxcutter, an X-ACTO knife, and some paint. Not only does Mom Taryn include image of her mini-house plans, but there's also a complete walkthrough that leads you through the construction process, step by step (we love how she even included a skylight on top!). Overall, this playhouse is a perfect alternative to the store-bought plastic ones, and with only a little planning and building time, it's practically free!
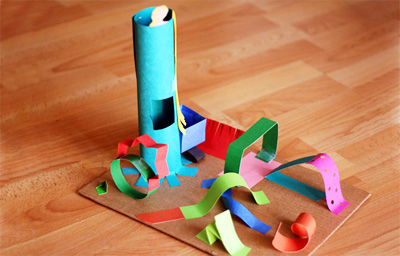 Sensational Sculptures
A little creativity can go a long way — and that's exactly why we love this quick and easy idea for making homemade 3D sculptures by Mom Amy of Let's Explore on Make and Takes.
On Friday afternoons, Amy likes to set up a free play art area for her two daughters, and though this crafty project is simple in premise, they both declared it to be one of their absolute favorites! To set up your own 3D sculpture art table, Amy recommends using a thick paper for the base (cardboard, a piece of a cereal box, or a file folder), and setting out colorful paper strips of various lengths and widths, scissors, and "sticky stuff" (tape, glue, or a stapler). Amy began the project by showing her girls a couple of tricks for giving the paper different dimensions — curling, folding, fringe cutting, hole punching, twisting — and she said that after the demo, they were off and running, creating a variety of wild designs that even her "mommy brain" would have never imagined! Certainly one project that goes to show the sky's the limit in terms of where a little creativity can take you.
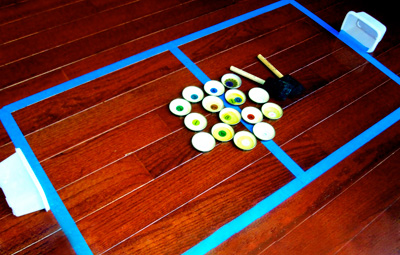 Hockey Play
Mom Kristina of Toddler Approved! shares this genius idea for making a number hockey game for her kiddo — and what a fabulous idea for spending a mucky day indoors!
Using a handful of common household items — painter's tape for the game's outline, baby food jars for the pucks, paintbrushes for the sticks, and tupperware for the goals — this cool game can help get your little one thinking about numbers as they score a goal with a specific number and have to match that puck with its partner on an extra sheet of paper. Be sure to check out Kristina's full tutorial for the rules they used and for tips on getting started — you're sure to have a new hockey lover on your hands come dinnertime!
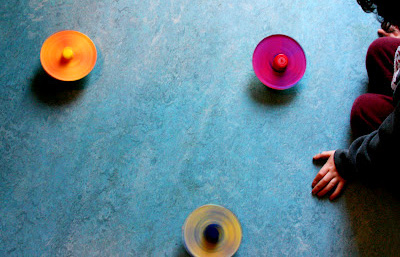 Color Theory at Its Finest
If you're looking for another great upcycling idea for your fun file, don't miss out on these cool CD color spinners shared on Mama's Little Muse.
A fantastic way to have a quick and easy color theory lesson (and a whole lot of spinning fun!), these CD top lookalikes are made with leftover discs, bottle caps (for the top), ping pong balls or marbles (for the bottom), paint or markers, and a little bit of glue and scissor work. To get started, Mom Carolyn traced the CDs onto a sheet of paper and let her little one get busy on shading in two color slices for each spinner. Once they started spinning, Carolyn says that it was a great opportunity to talk about primary and secondary colors, as the fast movement would blur the two included colors together into one! Visit the rest of the full post for the complete walkthrough — and to see the colors they used, along with the colors that came from spinning!
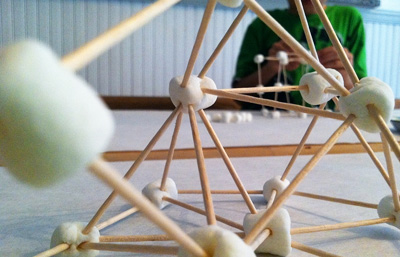 Crafty Construction
Got extra marshmallows and toothpicks tucked away in your pantry? Then you'll certainly love this fun activity featured on Mamascout for using the two to build with. (Your little architects will thank you later!)
Definitely one project that's "an oldie, but a goodie," this cool, open-ended building activity is one that mini engineers of all ages are sure to love — just pull out a bag of marshmallows and a box of toothpicks, and you're all set to start constructing! Overall, this is an excellent craft pick for a rainy day spent indoors, and one that's sure to last throughout the afternoon at that!