
Perfect recipes for your pint-size sous chef
Some days we all just need a little afternoon pick-me-up. After a morning of rushing around getting kids out the door, walking the dog and catching up on work, wouldn’t a mini apple pie or a chocolate oatmeal cookie hit the spot? We certainly think so, and are thrilled to share these three baking recipes from the creative genius behind the Baking With Rachel blog, Rachel Knecht. She selected these recipes for ParentMap specifically because they are foolproof options for baking with your preschooler (read up on her top tips for baking with littles). But if you’d rather get to lick the spoon yourself, pull out your mixing bowls and get to baking before the kids get home.
Find the other recipes:
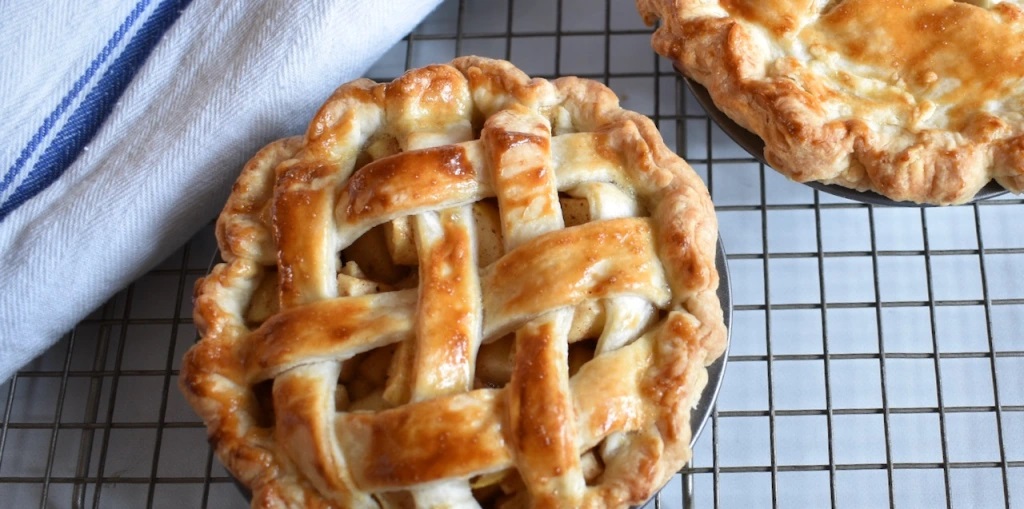
Mini Apple Pies
Serving notes: Store baked pies at room temperature for up to two days or in the refrigerator for up to four days. Serve warm apple pie with a scoop of ice cream for a classic combination.
- Yield: 4 mini 5-inch double-crust apple pies
- Active time: 30 minutes
- Chilling time: 2 hours and 20 minutes
- Bake time: 25–30 minutes
Double all-butter pie crust:
- 2 1/2 cups all-purpose flour
- 1 tablespoon sugar
- 2 1/2 teaspoons kosher salt (1 ¾ if using Morton)
- 1 cup butter (2 sticks ), cold and cubed
- 1 tablespoon cider vinegar
- 1/2 cup cold water
Apple filling:
- 4 tart medium apples, such as Honeycrisp or Pink Lady
- 1/3 cup sugar
- 1/4 cup all-purpose flour
- 2 teaspoons fresh lemon juice
- 1/2 teaspoon cinnamon
- 1/4 teaspoon nutmeg
To finish:
- 1 tablespoon heavy cream
- 1 egg yolk
- Sparkling sugar or raw sugar
Supplies:
- 4 mini 5-inch pie pans
Directions:
Add flour, sugar and salt to the bowl of a food processor fitted with a dough blade. Add cubed butter and pulse 5–8 times, until butter is the size of small peas. Drizzle in water and cider vinegar and pulse for a few seconds until the mixture starts to clump around the sides of the bowl. Dump dough onto a floured counter and knead it a few times to shape into a ball. The ball should be firm with butter visible. Divide dough into two equal pieces. Shape into balls and wrap with saran wrap. Press slightly to form disks and put in the refrigerator. It is usable after two hours. If the dough is frozen, put it in the refrigerator the night before making the pies.
Peel, core and slice apples. Cut the slices in half for shorter pieces. Put all the apples in a large bowl. Gently mix in sugar, flour, lemon juice, salt, cinnamon and cloves.
Take one pie dough disk out of the fridge and cut it into four equal pieces. Sprinkle the counter with flour. Roll out one piece of dough into a 7-inch circle. Flour the dough and rolling pin as needed to keep the dough from sticking. Place the dough into one of the pie pans and press gently to form the dough to the bottom of the pan, allowing the excess to drape over the edge. Repeat with remaining three pieces of dough.
Heap equal amounts of filling into each pie, creating a dome shape.
Take the remaining disk out of the refrigerator. Flour the counter again and divide into four equal pieces. Roll one piece at a time into a 7-inch circle. Choose your own adventure for the top crust! It’s important to work quickly so that the dough stays cold. Feel free to keep the other pieces of dough in the refrigerator if you need more time to allow your creative, perfectionist self to shine.
To make the lattice top crust, cut the circle into equal strips about 1/4-inch thick. Place the center strip horizontally in the middle of the pie. Space the next strips to the left and right of the middle strip 1/2 inch apart. Continue adding horizontal strips until you reach the end of the crust (usually five strips total). Weave the remaining strips laterally, alternating to create a basket weave.
Alternately, use a small cookie cutter or donut hole cutter to cut circles out of the rolled-out top crust. Shingle the circles around the top of the pie.
For a third option, place the rolled-out dough on top of the apple filling and cut steam slits in the top. Once the top crust is on the pie, use scissors to trim the excess dough to a 1-inch overhang. Roll the excess up onto itself so that the dough is at the edge of the pan. Flute or crimp edges to secure the top crust to the bottom crust.
Refrigerate pies for 20 minutes, or until the dough is cold. Heat the oven to 375℉. In a small bowl, use a fork to mix the egg yolk and cream. Use a pastry brush to brush the mixture on the top crust. Sprinkle with sparkling sugar or raw sugar, if desired.
Place pies on a baking sheet and bake for 25–30 minutes. Check at 15 minutes and rotate pan for even browning. The pies are done when the crust is deeply golden brown and the filling is bubbling.
Serve warm or at room temperature for best flavor.
Oatmeal Chocolate Chip Bites
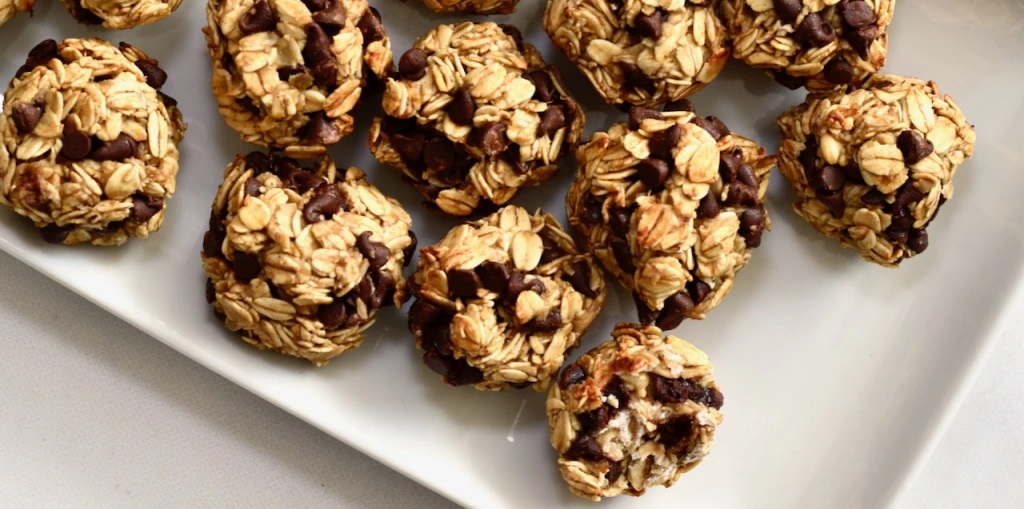
This recipe comes together in a snap and is the perfect accompaniment to any meal or snacktime. Be sure to let these cool before eating because the chocolate is hot and can burn little fingers and tongues.
Makes 12 to 16 bites
Ingredients:
- 1 medium ripe banana
- 1 egg white
- 1 tablespoon honey
- 1 2/3 cup old-fashioned or instant oats
- 1/2 cup mini chocolate chips
- 1/8 teaspoon salt
- 1/4 teaspoon cinnamon
Directions:
Heat oven to 350 ℉ and line a baking sheet with parchment paper. In a medium bowl use a fork to mash the banana until creamy. Add egg white, honey, oatmeal, salt and cinnamon; continue mixing with the fork until the dough is homogenous. Let it rest for five minutes.
Add in chocolate chips and mix until they are evenly distributed throughout the dough. The dough may look dry, but that is okay. Using your hands, firmly press the mixture together to form 2-inch balls and place them on the prepared baking sheet. Bake for 15 minutes or until the balls are golden brown on the bottom and dry to the touch. Cool and enjoy. Store in an airtight container at room temperature for up to three days.
Afternoon Snack Pumpkin Muffins

This recipe makes 24 standard-size muffins, or you can make 12 regular and 24 mini muffins. I like having both sizes on hand, and they freeze well. You could also leave the batter in the refrigerator and bake them off each day as needed. The batter will keep for three days. Of course, you could throw in some toasted nuts or chocolate chips if desired.
Ingredients:
- 2 cups (250g) white whole wheat flour
- 1 cup (125g) all-purpose flour
- 1 cup (200g) granulated sugar
- 1/2 cup (100g) brown sugar
- 2 teaspoons baking soda
- 1/2 teaspoon baking powder
- 1/2 teaspoon ground cloves
- 2 teaspoons ground cinnamon
- 1 teaspoon ground nutmeg
- 2 teaspoons kosher salt
- 15 oz. can pumpkin puree
- 2/3 cup (12 tablespoons, 6 ounces) unsalted butter, melted
- 3 eggs
- 1 tablespoon milk
- 2 tablespoons raw sugar, optional topping
Directions:
Preheat over to 350℉. Spray muffin tins or use cupcake liners to line the pan and set aside. In a large bowl, whisk flours, granulated sugar, brown sugar, baking soda, baking powder and spices; set aside. In a medium bowl, combine pumpkin, butter and eggs. Use a wooden spoon and stir pumpkin mixture into flour mixture. Stop mixing when flour has been incorporated. Add milk and incorporate. The batter will be loose but will still be a thick batter.
Use an ice cream scoop to fill the muffin tins 3/4 full, sprinkle the top with raw sugar and bake. The mini muffins take about 10 minutes and the larger ones are done in around 20 minutes. A toothpick will come out clean and the tops will spring back when touched. Let the muffins cool a few minutes and then remove from the pan. Let cool completely on a cooling rack. Store in an airtight container for up to three days or freeze.