Kids love learning about bugs and art is a great way to help them do it! The study of bugs and insects is called entomology. We’ve rounded up nine fun and creative activities that will also help kids discover interesting facts about bugs.
1. Fingerprint bugs
Finger painting is fun, but finger stamping is even better and kids’ tiny fingerprints are the perfect size for this project from Messy Little Monster. To make these colorful bugs, have your kids dip their fingers in paint or on stamp-pad ink to make the fingerprints. Once the fingerprints are dry, use markers to add in eyes, antennae, legs and wings.
Fun bug fact: Insects have three body parts, two antennae and six legs. If they have wings, the wings are attached to the thorax or the middle segment. Spiders have two body segments and eight legs (so they’re not insects).
2. Ants at a picnic
This craft project from Inventors of Tomorrow gives kids a chance to explore the science of magnetism. Cut an ant shape from black craft paper. Use steel brads (paper fasteners) to make antennae and legs. Have your child to decorate a paper plate by drawing their favorite food on. Place the ant on the plate. Hold a large magnet under the plate and make the ant run around over the food. Your kid will be thrilled with this simple and genius science experiment.
3. Roly-poly pill bugs
This simple paper plate bug can roll up into a full circle just like a roly-poly pill bug does when you poke it. Some families might call these potato bugs.
To make the roly-poly, trim part of the rim off a paper plate, and then cut the center of the plate into triangles. Punch a hole in the tip of each triangle. Fasten all the pieces together with a steel brad. In one triangle, punch a hole on the outer edge, twist on a pipe cleaner antenna and add an eye. Then cut legs from the rim of the paper plate and glue or tape them on. See Danielle’s Place for more details.
Fun bug fact: A roly-poly is not an insect — it is actually a crustacean (like shrimp!) and has seven pairs of legs.
4. Beaded butterflies and dragonflies
The pretty beaded bugs featured in the top image are made of pipe cleaners and beads and could easily be turned into jewelry. Find out how to make the beautiful butterflies at Fave Crafts, and dazzling dragonflies at One Little Project.
5. Melted crayon butterfly
This activity is a great one to use up all those old scraps of broken crayons you may have lying around the house.
Start by grinding up the old crayons with a cheese grater or a pencil sharpener. Lay out a piece of wax paper, and sprinkle on the crayon shavings. Place another piece of waxed paper on top. Cover with a piece of plain paper, then iron with a warm iron till the wax has melted and fused the two layers of wax paper together.
When it has cooled, cut it into a butterfly shape. Find full direction and a free butterfly template at Free Kids Crafts.
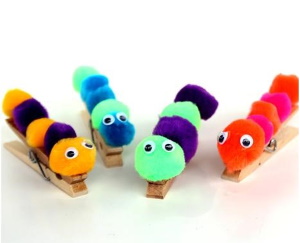
6. Pompom caterpillar
These fun little caterpillars are the perfect craft for younger kids. To make this project you will need a selection of colorful pompoms, pipe cleaners, googly eyes and clothespins. Check out the Think Craft blog to find out how to put them together.
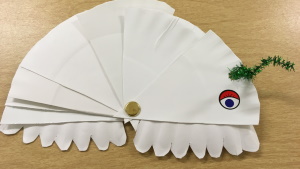
7. Butterfly wings
Give your pompom caterpillar a set of wings. Check out Danielle’s Place, for a cool design where the wings accordion-fold into a stack you can hide under the caterpillar.
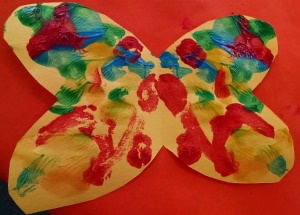
8. Rorschach butterfly
This art project from Inventors of Tomorrow is a great demonstration of symmetry. Fold a piece of colorful craft paper in half. Cut out a butterfly shape and unfold. Add paint to one half of the butterfly, then fold the butterfly, and press the two sides together. When you open it up, you’ll see that the paint has printed onto both sides.
9. The life cycle of a butterfly
For this craft, start by making a pompom caterpillar (as described in No. 6 above). Then, cut out a green leaf and glue on grains of rice to represent eggs. Cut out more green leaves and punch holes in them to make chewed up leaves. Glue the leaves onto a piece of paper if you like. Get a cardboard toilet paper tube to be the cocoon. Then make a Rorschach butterfly (No. 8 above).
This project is perfect for interactive and imaginative play and kids can have their caterpillar nibble the leaves, climb into the cocoon, come out and be the center of the butterfly, flapping its wings.
All insects have multiple stages in their life cycle. Some, like dragonflies and grasshoppers, have three stages. Some have four stages. The best-known example is the butterfly. Find more ideas at Inventors of Tomorrow.